How to Turn a 16:9 Video Into a 9:16 Vertical Short With ffmpeg: Crop, Blurred Fill or Pad, Compared
📅 September 29, 2026 · ⏱️ 9 min read
Split the video in two, blow one copy up to fill the whole 1080x1920 frame and blur it, shrink the other copy to fit the width, and lay the sharp copy over the middle of the blurred one. That keeps the whole picture, edges included, and leaves no black bars. Replace landscape.mp4 with your file:
ffmpeg -hide_banner -loglevel error -y -i landscape.mp4 -filter_complex "
[0:v]split=2[a][b];
[a]scale=1080:1920:force_original_aspect_ratio=increase,crop=1080:1920,boxblur=20:2[bg];
[b]scale=1080:-2[fg];
[bg][fg]overlay=(W-w)/2:(H-h)/2,setsar=1
" -c:v libx264 -crf 18 -pix_fmt yuv420p blur.mp4
That is one of three standard ways to go from 16:9 to 9:16, and it is not always the right one. The other two are a centre crop, which fills the screen with real picture but cuts the sides off, and a letterbox pad, which keeps everything but surrounds it with a flat colour. This page runs all three on the same clip, shows a frame from each output, and ends with a plain rule for choosing.
Every command below was run with ffmpeg 4.4.2, the version Ubuntu 22.04 ships, in an empty directory. Every output is the same spec the YouTube Shorts automation pipeline targets: 1080x1920, H.264 at CRF 18, setsar=1 and -pix_fmt yuv420p.
A test clip with the subject off-centre
A real clip would make the comparison depend on where its subject happened to be, so the source here is synthetic: ffmpeg’s testsrc2 pattern at 1920x1080, with an orange box labelled SUBJECT drawn in the left third and a small caption labelled UI TEXT in the top-right corner. Those two stand in for a person standing to one side of the shot and for on-screen text near an edge.
ffmpeg -hide_banner -loglevel error -y \
  -f lavfi -i "testsrc2=size=1920x1080:rate=30:duration=5" \
  -vf "drawbox=x=200:y=300:w=440:h=480:color=orange:t=fill,
drawtext=text='SUBJECT':x=275:y=510:fontsize=64:fontcolor=black,
drawtext=text='UI TEXT':x=1560:y=60:fontsize=56:fontcolor=white:box=1:boxcolor=black:boxborderw=12" \
  -c:v libx264 -pix_fmt yuv420p landscape.mp4
drawtext needs an ffmpeg built with libfreetype and uses fontconfig’s default font. If yours refuses it, delete the two drawtext= lines and the comma before them: the orange box alone still shows what each method does.
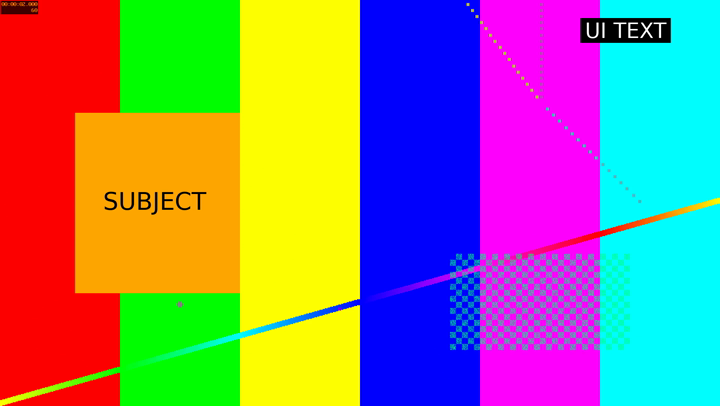
This is the frame at 2 seconds, the moment every frame below was taken from.
(a) Centre crop: fill the screen, lose the sides
ffmpeg -hide_banner -loglevel error -y -i landscape.mp4 \
  -vf "scale=1080:1920:force_original_aspect_ratio=increase,crop=1080:1920,setsar=1" \
  -c:v libx264 -crf 18 -pix_fmt yuv420p crop.mp4
scale=1080:1920:force_original_aspect_ratio=increase scales the picture up, keeping its shape, until it covers 1080x1920 in both directions. For a 1920x1080 source that is 3413x1920: the height matches and the width overshoots. crop=1080:1920 then cuts a 1080-wide window out of it, and with no x given it takes the middle. The crop keeps 1080 of the 3413 columns the scale produced, so less than a third of the original width survives, and it is always the middle of the frame.
This is the method the Shorts pipeline uses, and on this clip it is the wrong one:

Both the SUBJECT box and the UI TEXT caption are gone. Nothing warns you: the command succeeds and the output is a perfectly valid 1080x1920 file.
Keeping an off-centre subject: move the crop window
If the subject sits in one place, you can still crop, just not from the middle. Give crop an x:
ffmpeg -hide_banner -loglevel error -y -i landscape.mp4 \
  -vf "scale=1080:1920:force_original_aspect_ratio=increase,crop=1080:1920:x=200:y=0,setsar=1" \
  -c:v libx264 -crf 18 -pix_fmt yuv420p offset.mp4
x is measured in the scaled frame, not the source, so it can go from 0 to 2333 (3413 minus 1080). To find it, multiply the subject’s source position by 1920/1080. The SUBJECT box spans x 200 to 640 in the 1920-wide source, which is roughly 356 to 1138 after the scale, and a window starting at x=200 covers 200 to 1280, so the whole box is inside it. The limit is that x is fixed for the whole clip. A subject that walks across the frame needs a time-varying expression or a tracking tool, not one number.
(b) Blurred fill: keep everything, hide the bars
ffmpeg -hide_banner -loglevel error -y -i landscape.mp4 -filter_complex "
[0:v]split=2[a][b];
[a]scale=1080:1920:force_original_aspect_ratio=increase,crop=1080:1920,boxblur=20:2[bg];
[b]scale=1080:-2[fg];
[bg][fg]overlay=(W-w)/2:(H-h)/2,setsar=1
" -c:v libx264 -crf 18 -pix_fmt yuv420p blur.mp4
Read the graph in four steps:
split=2[a][b]makes two copies of the video.[a]gets the centre crop from approach (a), thenboxblur=20:2: a box blur of radius 20 applied twice. That is the background.[b]is scaled to1080:-2, the full width with the height chosen to keep the shape and rounded to an even number. For this source that is 1080x608.overlay=(W-w)/2:(H-h)/2puts the sharp copy in the middle of the blurred one, which leaves 656 rows of blurred picture above it and 656 below.
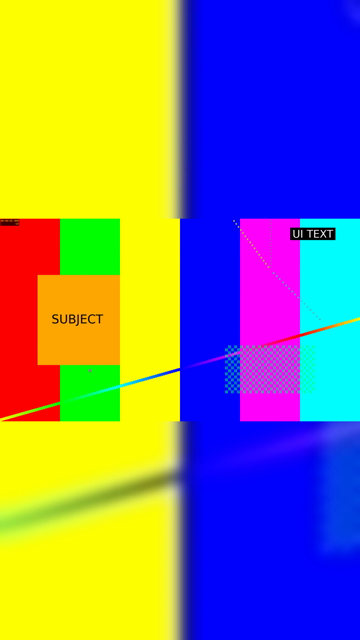
The whole source survives, SUBJECT and UI TEXT included. The cost is size: the real picture is only 608 of the 1920 rows, under a third of the screen, so a face that filled a widescreen shot is small on a phone. The blurred band also moves with the video, which is the point (it reads as part of the shot rather than as a border) but it is busy behind captions. A larger radius, such as boxblur=40:2, calms it down.
(c) Letterbox pad: keep everything, add a border
ffmpeg -hide_banner -loglevel error -y -i landscape.mp4 \
  -vf "scale=1080:1920:force_original_aspect_ratio=decrease,pad=1080:1920:(ow-iw)/2:(oh-ih)/2:color=black,setsar=1" \
  -c:v libx264 -crf 18 -pix_fmt yuv420p pad.mp4
force_original_aspect_ratio=decrease is the opposite of the crop’s increase: it scales down until the picture fits inside 1080x1920, which again gives 1080x608. pad then grows the canvas to 1080x1920 and centres the picture with (ow-iw)/2:(oh-ih)/2. color= takes any colour ffmpeg understands, by name or as hex.
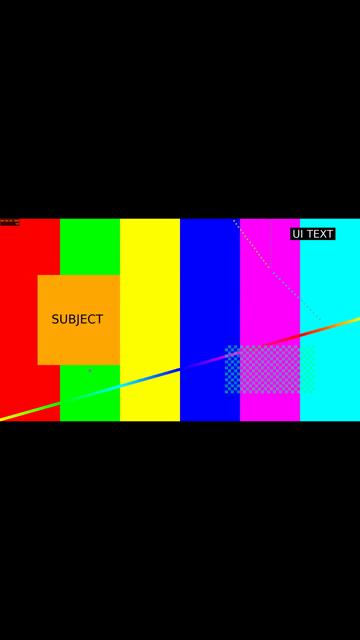
The picture is the same size as in the blurred fill. The only difference is what fills the rest of the screen, and it is a simpler filter graph, with no second copy of the video to scale and blur. A flat band is also the easiest place to put a title or captions: in the blurred version they would sit on moving colour.
When to use which
Crop when the subject is in the middle, use the blurred fill when the whole frame matters, and pad when text or UI must not be cut. In more detail:
- (a) Crop when the subject is in the middle, such as a talking head or a centred product shot. Of the three, it is the only one where the video fills the phone screen. If the subject is off to one side but stays put, crop with an
x. - (b) Blurred fill when the whole frame matters and the video is the point: a wide landscape, a two-person shot, gameplay where the action moves around.
- (c) Pad when text, a UI or anything near the edges must not be cut, such as a screen recording, a slide or a chart, and you want a clean band for a title.
To get one of these three commands sized for your own clip, with music ducked under the voice or subtitles burned in if you need them, use the Shorts ffmpeg command builder.
Check the output with ffprobe
A vertical file that looks right in one player can still be wrong. This prints the codec, width, height, sample aspect ratio (SAR), pixel format and duration of each output:
for f in crop.mp4 blur.mp4 pad.mp4 offset.mp4; do
  echo "$f $(ffprobe -v error -select_streams v:0 \
    -show_entries stream=codec_name,width,height,sample_aspect_ratio,pix_fmt:format=duration \
    -of csv=p=0 "$f" | paste -sd,)"
done
It printed, on ffmpeg 4.4.2:
crop.mp4 h264,1080,1920,1:1,yuv420p,5.000000
blur.mp4 h264,1080,1920,1:1,yuv420p,5.000000
pad.mp4 h264,1080,1920,1:1,yuv420p,5.000000
offset.mp4 h264,1080,1920,1:1,yuv420p,5.000000
h264,1080,1920,1:1,yuv420p is the line to look for. Two parts of it are easy to lose.
SAR 1:1 needs setsar=1. scale keeps the display shape exact by marking the pixels very slightly non-square whenever the new size has to be rounded, and 1920x1080 scaled to 1920 rows would be 3413.33 columns wide. Leave setsar out and the centre-crop output reports a sample aspect ratio of 10240:10239 and a display aspect ratio of 1920:3413 instead of 1:1 and 9:16. The same run of the pad command without setsar=1 gave 1216:1215. Those pixels are almost square, but a player or upload pipeline that honours the SAR will stretch the picture by a fraction of a percent, and one that checks for exactly 9:16 will not see it.
yuv420p needs -pix_fmt yuv420p. libx264 encodes in whatever pixel format it is handed, if it can. This test clip is already yuv420p, so it would come out right either way, but a source in RGB, such as a screen capture or a PNG sequence, does not. Encoded without -pix_fmt, an RGB test source came out as yuv444p with the profile High 4:4:4 Predictive, which many hardware decoders do not support. With the flag it was yuv420p at the High profile.
Pulling a frame to look at
The pictures on this page are one frame from each output at 2 seconds, taken with the same ffmpeg:
for f in crop blur pad; do
  ffmpeg -hide_banner -loglevel error -y -ss 2 -i "$f.mp4" -frames:v 1 -vf scale=360:-2 "$f.png"
done
ffmpeg -hide_banner -loglevel error -y -ss 2 -i landscape.mp4 -frames:v 1 -vf scale=720:-2 landscape.png
Putting -ss before -i seeks the input instead of decoding up to that point, which is fast. scale=360:-2 shrinks the frame so it is light enough for a web page. Drop it to get a full 1080x1920 frame for checking detail.
What this does not tell you
The clip is synthetic, with flat colour bars and one box, so it shows geometry and nothing about quality. Real footage with fine detail looks softer after the crop’s upscale, since a 1080-row source becomes 1920 rows, and boxblur on a real scene looks different from boxblur on colour bars. Only ffmpeg 4.4.2 was tested. The filter options used here are old and stable, but newer builds were not run. None of this covers audio (the commands name no audio codec, so an audio track in your file is re-encoded with ffmpeg’s default for MP4, AAC) or the rest of an upload pipeline. The Raspberry Pi Shorts post covers that, and its ffmpeg recipe uses the centre crop from (a).
Follow new posts by RSS: paste dankdev.com/feed.xml into any feed reader. It is a plain XML file — no signup, no email address, no account. Posts land there the same day they go up, and there is nothing to unsubscribe from later.