ffmpeg Image to Video: Length, Audio and Zoom
📅 October 11, 2026 · ⏱️ 19 min read
To turn a still image into a video with ffmpeg, loop the picture and stop when the audio ends: ffmpeg -loop 1 -i image.png -i audio.wav -c:v libx264 -tune stillimage -pix_fmt yuv420p -shortest out.mp4. -loop 1 repeats the one image as a stream of frames that never ends on its own, -i audio.wav adds the sound, -tune stillimage tells x264 that the picture hardly changes, -pix_fmt yuv420p makes a file ordinary players can open, and -shortest is meant to stop the encode when the audio runs out. That last part did not hold in the run below: a 4 s tone gave a 6.080000 s video. If the length matters, give it with -t as well.
ffmpeg -loop 1 -i image.png -i audio.wav -c:v libx264 -tune stillimage -pix_fmt yuv420p -shortest out.mp4The test image and the tone
Every command on this page ran with ffmpeg 4.4.2, the version Ubuntu 22.04 ships, in an empty directory, one after another in the same shell. The inputs are made by ffmpeg itself from its lavfi test sources, so you can rebuild them: a 1080x1920 picture (the shape of a Short) with a grid on dark blue and one white square up and to the left of centre, and a 440 Hz tone. No font is used anywhere on this page. The white square is there for the zoom section, where its position is tracked frame by frame.
# A 1080x1920 still: a grid on dark blue with one white 40x40 square up and to the
# left of centre (the marker the zoom measurements track), and a 4 s 440 Hz tone.
ffmpeg -v error -f lavfi -i "color=c=0x1d2b3a:s=1080x1920,drawgrid=w=90:h=90:t=2:c=0x8899aa,\
drawbox=x=250:y=460:w=40:h=40:c=white:t=fill" -frames:v 1 image.png
ffmpeg -v error -f lavfi -i "sine=frequency=440:sample_rate=48000:duration=4" audio.wav
ffprobe -v error -of csv=p=0 -show_entries stream=width,height,pix_fmt image.png
ffprobe -v error -of csv=p=0 -show_entries format=duration audio.wav
1080,1920,rgb24
4.000000The PNG is rgb24, full-colour RGB. That matters for -pix_fmt below. The tone is 4.000000 s long.
Setting the length: -shortest, and what it actually gave
The image2 demuxer docs describe loop as “If set to 1, loop over the input. Default value is 0.” With -loop 1 the image never runs out, so something else has to end the video. -shortest is the usual answer. The ffmpeg docs say it will “Finish encoding when the shortest output stream ends.” Here is what the answer command wrote:
# What the answer command wrote: one line per stream
ffprobe -v error -of csv=p=0 \
  -show_entries stream=codec_type,r_frame_rate,duration,nb_frames out.mp4
video,25/1,6.080000,152
audio,0/0,4.000000,189The audio stopped at 4.000000 s, as it should. The video kept going to 6.080000 s, 2.08 s past the end of the sound: 152 frames where 100 would have matched. A player shows the picture with silence for the last 2.08 s. The frame rate is 25/1 because the image2 demuxer’s framerate option “defaults to 25”, and nothing on the command line changed it.
The same docs give a reason to expect some slack: “Note that this option may require buffering frames, which introduces extra latency.” My reading, which the next run supports but does not prove, is that libx264 holds frames back before it writes them, so when the audio runs out there is still video in the pipe, and it gets written. If that is right, the overshoot should change with how the encoder is set up:
# The same encode with one thread, then with the muxer told to stop at the shortest stream too
nproc
ffmpeg -v error -loop 1 -i image.png -i audio.wav -c:v libx264 -tune stillimage \
  -pix_fmt yuv420p -threads 1 -shortest one-thread.mp4
ffmpeg -v error -loop 1 -i image.png -i audio.wav -c:v libx264 -tune stillimage \
  -pix_fmt yuv420p -shortest -fflags +shortest -max_interleave_delta 100M muxer.mp4
for f in one-thread.mp4 muxer.mp4; do
  echo "$f $(ffprobe -v error -of csv=p=0 -select_streams v -show_entries stream=duration,nb_frames $f)"
done
4
one-thread.mp4 5.720000,143
muxer.mp4 4.120000,103nproc says this machine has 4 processing units, and the answer command let libx264 use them all. With -threads 1 the overshoot shrank to 1.72 s. With -fflags +shortest -max_interleave_delta 100M, which tells the muxer to stop at the shortest stream as well, it shrank to 0.12 s, 3 frames. Neither is zero, and the first number will be different on a machine with a different number of cores. ffmpeg 4.4.2’s help describes the flag as “stop muxing with the shortest stream”. Today’s docs also list a -shortest_buf_duration option to control the buffering; ffmpeg 4.4.2 does not have it (its full help has no line for it).
So do not trust -shortest for an exact length. Ask the audio how long it is and pass that to -t, which the docs describe as: “When used as an output option (before an output url), stop writing the output after its duration reaches duration.” The second command below is the other common case, a silent clip of a fixed length:
# Set the length yourself: -t with the audio's own duration, and -t 5 with no audio at all
LEN=$(ffprobe -v error -of csv=p=0 -show_entries format=duration audio.wav)
ffmpeg -v error -loop 1 -i image.png -i audio.wav -c:v libx264 -tune stillimage \
  -pix_fmt yuv420p -t "$LEN" fitted.mp4
ffmpeg -v error -loop 1 -i image.png -c:v libx264 -tune stillimage -pix_fmt yuv420p -t 5 silent.mp4
for f in fitted.mp4 silent.mp4; do
  echo "$f"
  ffprobe -v error -of csv=p=0 -show_entries stream=codec_type,duration,nb_frames $f
done
fitted.mp4
video,4.000000,100
audio,4.000000,189
silent.mp4
video,5.000000,125Both came out exact: 4.000000 s and 100 frames for the fitted clip, 5.000000 s and 125 frames (5 s at 25 fps) for the silent one. Keep -shortest in the command if you like, but put -t beside it. -t is an output option here because it comes after the inputs and before the output name.
Why -pix_fmt yuv420p is in the command
Leave it out and libx264 does not convert the RGB picture down to the usual 4:2:0 colour. It picks the nearest format it can keep:
# Leave -pix_fmt out and see what libx264 picks for an RGB PNG
ffmpeg -v error -loop 1 -i image.png -c:v libx264 -t 1 nopix.mp4
ffprobe -v error -of csv=p=0 -show_entries stream=pix_fmt,profile nopix.mp4
High 4:4:4 Predictive,yuv444pyuv444p in the “High 4:4:4 Predictive” profile is a valid H.264 file, but not the one most players expect. The ffmpeg H.264 encoding guide puts it this way: “You may need to use -vf format=yuv420p (or the alias -pix_fmt yuv420p) for your output to work in QuickTime and most other players. These players only support the YUV planar color space with 4:2:0 chroma subsampling for H.264 video.” I did not open the file in any player; the profile line above is the whole measurement. With -pix_fmt yuv420p, every file on this page is plain yuv420p.
What -tune stillimage changes
The same guide lists the tune as “stillimage – good for slideshow-like content”. libx264 writes its settings into every file, so you can see what the tune did:
# What -tune stillimage changed: the x264 settings string stored in each file, and its size
ffmpeg -v error -loop 1 -i image.png -c:v libx264 -pix_fmt yuv420p -t 5 untuned.mp4
for f in silent.mp4 untuned.mp4; do
  echo "$f $(stat -c %s $f) bytes $(strings $f | grep -oE '(deblock|psy_rd)=[^ ]+' | tr '\n' ' ')"
done
silent.mp4 18404 bytes deblock=1:-3:-3 psy_rd=2.00:0.70
untuned.mp4 18315 bytes deblock=1:0:0 psy_rd=1.00:0.00 The tuned file has a weaker deblocking filter (deblock=1:-3:-3 against 1:0:0) and stronger psychovisual tuning (psy_rd=2.00:0.70 against 1.00:0.00): settings that keep fine detail in a picture instead of smoothing it. On this flat test image it did not make the file smaller; the tuned one is 89 bytes bigger. A photo with texture is where the tune is meant to help, and I have not measured that. For a picture that moves, as in the zoom below, I left the tune off, because the frames are no longer the same picture.
A slow zoom with zoompan
zoompan crops a window out of each input image, makes that window smaller frame by frame, and scales it back up to the output size, which looks like a zoom. The options in the zoompan docs, which are the same seven ffmpeg 4.4.2’s help lists:
zoom,z: “Set the zoom expression. Range is 1-10. Default is 1.” The 4.4.2 help gives the default but not the range.x,y: “Set the x and y expression. Default is 0.” They are the top-left corner of the window, in input pixels.d: “Set the duration expression in number of frames.” It is how many output frames one input image becomes, “Default is 90.”s: “Set the output image size, default is ’hd720’.” Set it, or a 1080x1920 picture comes out landscape.fps: “Set the output frame rate, default is ’25’.”
Inside the expressions, zoom is the zoom of the previous frame, iw and ih are the input size, and on is the output frame number. The usual centred zoom-in is z='min(zoom+0.0015,1.5)' with x='iw/2-(iw/zoom/2)' and y='ih/2-(ih/zoom/2)': grow the zoom by 0.0015 a frame, and keep the window centred. With d=120 and fps=30 that is 4 s, and the zoom reaches about 1.18x. There is no -loop 1 here: zoompan makes all 120 frames from the one input image.
The wobble, measured
The common complaint is that this zoom wobbles. To measure it rather than eyeball it, the next block keeps only the near-white pixels of each output frame, so only the square is left, and lets the bbox filter report where they are. The bbox docs say it will “Compute the bounding box for the non-black pixels in the input frame luma plane.” The centre of that box is the square’s centre. The square is left of the image centre, so as the zoom grows it should move steadily left, a little each frame, and never back.
# Track the white square: keep only near-white pixels, let bbox report where they are,
# and print the square's centre (x) frame by frame, then a summary of the steps it took.
track() {
  ffmpeg -hide_banner -i image.png -vf "$1,lutyuv=y='if(gt(val,200),255,0)':u=128:v=128,\
bbox=min_val=128" -f null - 2>&1 | grep -o 'x1:[0-9]* x2:[0-9]*' | tr ':' ' ' |
  awk '{ x[NR] = ($2 + $4) / 2 } END {
    dir = (x[NR] > x[1]) ? 1 : -1
    for (i = 2; i <= NR; i++) { s = (x[i] - x[i-1]) * dir
      if (s < 0) back++; if (s > big) big = s; if (i <= 13) path = path " " x[i] }
    printf "first 13 x:%s%s\n", " " x[1], path
    printf "%d frames, x %s -> %s, steps backwards: %d, largest step: %s px\n",
      NR, x[1], x[NR], back, big }'
}
Z="x='iw/2-(iw/zoom/2)':y='ih/2-(ih/zoom/2)':d=120:s=1080x1920:fps=30"
track "zoompan=z='min(zoom+0.0015,1.5)':$Z"
first 13 x: 270 269.5 268.5 268.5 267.5 268 267.5 266.5 266.5 266.5 266 265.5 264.5
120 frames, x 270 -> 221.5, steps backwards: 16, largest step: 1 pxOver 120 frames the square’s centre went from x = 270 to 221.5, but 16 of its steps went the wrong way, back towards the centre: look at frame 5, 268 after 267.5 (the list starts at frame 0). No step was bigger than 1 px, so this is not a jump; it is a shimmer, a one-pixel back-and-forth along every edge in the picture. The usual explanation is that zoompan places its window on whole input pixels, so the window snaps from one pixel to the next instead of sliding. At a zoom of about 1.18x one input pixel is 1.18 output pixels wide, so the snaps show.
The fix: scale up first
Scale the image up before zoompan, so that one input pixel is a fraction of an output pixel, and let zoompan’s s= bring it back down to 1080x1920. Four times is the usual factor (scale=4320:-1, so 1080 x 4 = 4320 wide); one input pixel is then about 0.295 output pixels at the end of the zoom.
# The fix: scale the picture up 4x before zoompan; zoompan's s= scales it back down
track "scale=4320:-1,zoompan=z='min(zoom+0.0015,1.5)':$Z"
first 13 x: 269 269 268.5 268 267.5 267.5 266.5 266.5 266.5 265.5 265.5 264.5 264.5
120 frames, x 269 -> 221, steps backwards: 0, largest step: 1 pxThe same 120 frames, the same distance travelled (x = 269 to 221), and 0 steps backwards instead of 16. The steps are still whole pixels, because the output is made of whole pixels, but they now all go the same way: the square slides instead of shimmering. That is the measured part. The cost is that zoompan works on a 4320x7680 picture, 16 times the pixels, so it is slower. Use a smaller factor if that hurts, and measure with the same track function.
Here are the first eight frames of each version, cut around the square’s top-left corner and enlarged so that one pixel is a block. The red line is drawn at the same place in every frame.
# Frames 0 to 7 of each version, cut to the square's top-left corner, enlarged 8x,
# in rows of four. The red line is drawn at the same place in every frame: as the
# zoom grows, the square's left edge should only ever move towards it.
strip() {
  ffmpeg -v error -i image.png -vf "$2,drawbox=x=240:y=0:w=1:h=ih:c=red:t=fill,\
select='lte(n,7)',crop=32:32:232:446,scale=256:256:flags=neighbor,tile=4x2" -frames:v 1 "$1"
}
strip naive-strip.png "zoompan=z='min(zoom+0.0015,1.5)':$Z"
strip scaled-strip.png "scale=4320:-1,zoompan=z='min(zoom+0.0015,1.5)':$Z"
sha256sum naive-strip.png scaled-strip.png
6592da4d9a22ab02ea17925945f99b1291dc9866aa4c0288c21e9bb7e20afd3f naive-strip.png
b73306bc3e2ccae0cfc89c872f07975c8a99a3d3e9cdc103d301ce12eb779ac6 scaled-strip.png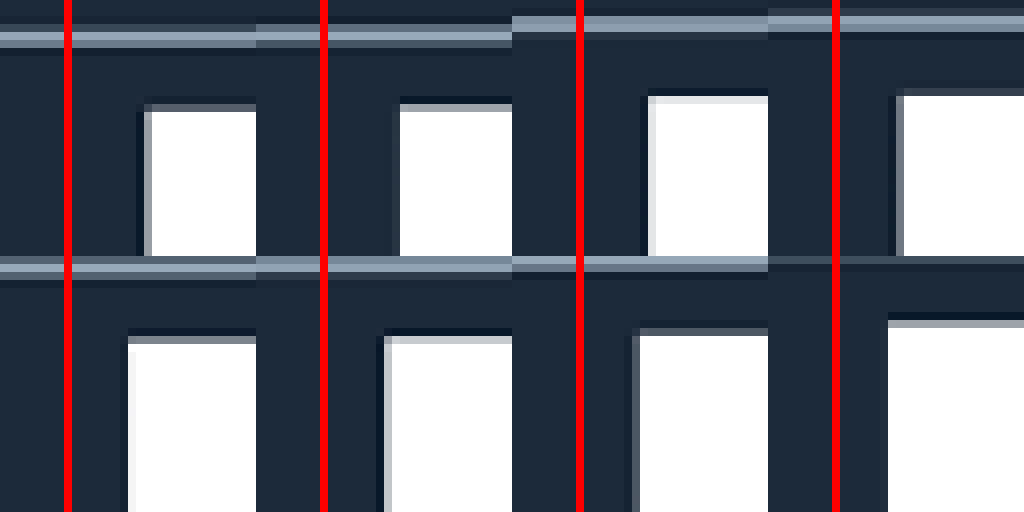
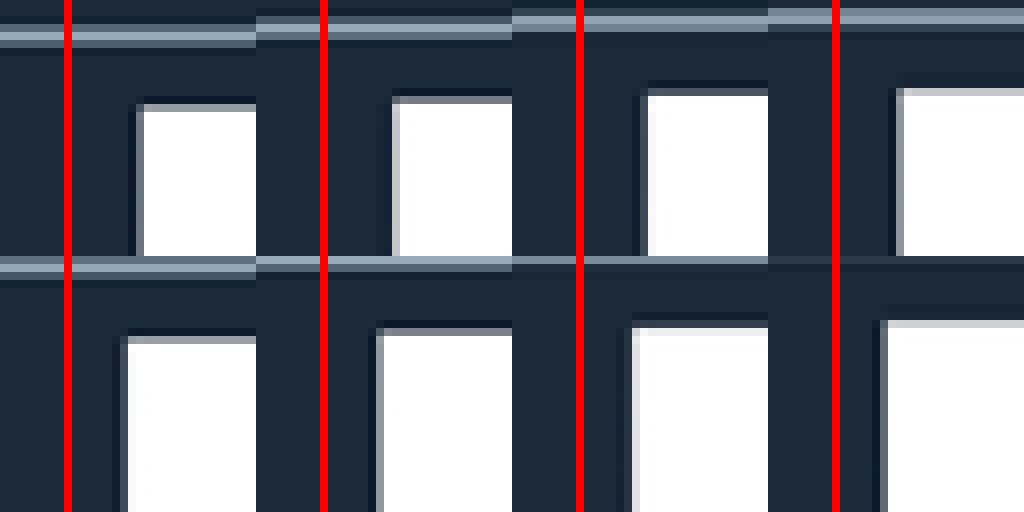
In the plain version the square’s left edge closes in on the red line, then in frame 5 steps one pixel away from it again. In the scaled version it only ever closes in. Steps like that one, 16 of them in 120 frames, are what the count above measures.
The finished clip, with the tone, at Shorts size:
# The finished clip: the scaled zoom, with the tone, as a Short
ffmpeg -v error -i image.png -i audio.wav \
  -filter_complex "[0:v]scale=4320:-1,zoompan=z='min(zoom+0.0015,1.5)':$Z[v]" \
  -map "[v]" -map 1:a -c:v libx264 -pix_fmt yuv420p -c:a aac zoom.mp4
ffprobe -v error -of csv=p=0 \
  -show_entries stream=codec_type,width,height,r_frame_rate,duration,nb_frames zoom.mp4
video,1080,1920,30/1,4.000000,120
audio,0/0,4.000000,1891080x1920, 30/1, 4.000000 s, 120 frames: d=120 at fps=30 lands exactly on the 4 s tone, so this one needs neither -shortest nor -t. Make d the audio length times the frame rate and the two end together.
Zooming out (the Ken Burns direction, reversed)
A zoom-out starts close and pulls back. Writing it with the output frame number on makes the start and end explicit: z='1.18-0.0015*on' starts at 1.18x and comes down to about 1x over the 120 frames. The same scale-up applies, and the same measurement:
# Zoom out instead: start at 1.18x and come back to 1x, using the output frame number (on)
track "scale=4320:-1,zoompan=z='1.18-0.0015*on':$Z"
first 13 x: 221 221.5 222 222.5 222.5 223.5 223.5 223.5 224.5 224.5 225.5 225.5 225.5
120 frames, x 221 -> 269, steps backwards: 0, largest step: 1 pxThe square now travels the other way, from x = 221 out to 269, with 0 steps backwards. The start and end positions mirror the zoom-in’s (221 and 269), because it is the same set of windows played in reverse. To pan while zooming, which is the full Ken Burns move, change x and y from the centring expressions to ones that move with on. I did not measure a pan here.
Many images: an image sequence with -framerate
For a slideshow, number the images and give the pattern. The image2 docs say a pattern may contain %d or %0Nd, “which specifies the position of the characters representing a sequential number in each filename matched by the pattern”, so img%03d.png matches img001.png, img002.png and so on. -framerate before the input sets how fast the images are read, so -framerate 1/2 is one image every 2 seconds. -r 30 after it sets the output rate, so each image is repeated to fill its 2 seconds at 30 fps.
# An image sequence: three numbered stills, two seconds each
for i in 1 2 3; do
  ffmpeg -v error -f lavfi -i "color=c=0x1d2b3a:s=1080x1920,drawgrid=w=90:h=90:t=2:c=0x8899aa,\
drawbox=x=$((i * 270 - 60)):y=900:w=120:h=120:c=white:t=fill" -frames:v 1 "$(printf 'img%03d.png' $i)"
done
ffmpeg -v error -framerate 1/2 -i img%03d.png -c:v libx264 -r 30 -pix_fmt yuv420p slides.mp4
ffprobe -v error -of csv=p=0 -show_entries stream=r_frame_rate,duration,nb_frames slides.mp430/1,6.000000,180Three images at 2 s each, 6 s, and 180 frames at 30/1. The numbering does not have to start at 1: the image2 demuxer’s start_number “Default value is 0”, and it searches the first few numbers for the first file that exists, which is how img001.png was found here.
In a Shorts pipeline
In the YouTube Shorts automation on a Raspberry Pi pipeline, one 9:16 image is rendered per clip as a seed for an AI video generator. The commands on this page are a way to get a clip out of such an image without the generator: a still with a slow zoom, cut to the length of its narration with d or -t. The Shorts ffmpeg command builder writes the command that turns a clip into a 1080x1920 Short; for a still, the zoom command above already outputs 1080x1920.
What these numbers do not cover: the -shortest overshoot depends on the encoder setup and core count, so measure your own with the ffprobe line in the second block. The wobble was measured on one flat synthetic image along one axis; a photograph hides some of it in texture and shows more of it on sharp straight edges.
Follow new posts by RSS: paste dankdev.com/feed.xml into any feed reader. It is a plain XML file — no signup, no email address, no account. Posts land there the same day they go up, and there is nothing to unsubscribe from later.